I apologize for it being so long since I last posted on my blog! I have been beyond swamped consistently for the past six months. However, my life is finally starting to slow down a bit and I am able to breathe a little here and there. Also, I developed a pretty nasty summer cold that forced me to call out of work today. So I figured that while I sit in bed, I would share with you the major happenings of the past few months of my life!
One of my favorite moments of 2013 thus far was being cast as the Female Swing in the world premiere musical "Three Little Birds" at Adventure Theatre MTC in Glen Echo, Maryland. The show was based off a children's book written by music legend Bob Marley's eldest daughter Cedella. In turn, Cedella's book was based off one of her father's songs, also entitled Three Little Birds. The incredible Michael Bobbit adapted the story for stage and John Cornelius arranged and adapted many of Bob Marley's most famous tunes to fit the concept of the production. Does this sound like an awesome show yet?
Well it was. Nick Olcott directed the extraordinary six actor cast in the most fun, brightly colored, upbeat, and unique production that I have ever been a part of. 3LB was incredibly well received by the public and got amazing reviews. The production actually did so well, that in February 2014, it will be playing for a limited engagement at the Off-Broadway children's theatre, The New Victory Theatre!
I was absolutely blessed to be a part of this production and had an incredible time working with and learning from so many talented and beautiful people. I also got to perform as Nansi in the second performance and as Cedella in one of the final performances of the run, both of which were absolutely incredible experiences.
As soon as 3LB closed, I was asked to be an understudy in ATMTC's next show "Big Nate: The Musical" , another world premiere musical. Based on the Big Nate comic strips and books, the story was a high energy children's musical about the trials and tribulations of being a sixth grader, as told through the eyes of Nate Wright. I understudied Jenny and Mrs. Godfrey/Ellen Wright in this show and again, I had a blast and a half. Though this rock-musical was completely different than 3LB, I was again so blessed and thankful that I was given the opportunity to be a part of it.
During the run of "Big Nate", I auditioned for and was cast as Deloris/Ensemble in "The Pajama Game" at Montgomery College Summer Dinner Theatre. Though I had been in the show before (when I was 17, I played Gladys), this show was an entirely different experience. This time, I got to be in numbers that I wasn't in during my first time in the show, and vice-versa. The production concept was much more abstract than the first time and Jay Brock's directing style helped us actors to really flesh out the production. The whole idea of dinner theatre was also introduced to me, as having a two hour waiting shift prior to curtain completely changed my process of preparing for a show. I grew so close to my cast though throughout this process, as well as the cast for the other company show, "The Wiz" (which I am currently on costume crew for). This whole experience has been really fun, and though definitely time consuming, I am so glad that I got to be a part of such a wonderful family.
In addition to working at MCSDT for the summer, I am also currently working as a Drama Specialist/Athletic's Counselor at TIC Summer Camp in DC. TIC is universally considered an incredibly unique summer camp, as it merges Technology and Athletics into one experience for 6-16 year-olds. The campers split their day half and half between their chosen technology concentration (Programming, Film-making, Animation, Digital Arts, Digital Music, Web Design, etc), and a myriad of sports activities that also may include one hour of either Tennis or Drama (with me!). It is an amazing system and I have met some f the coolest kids in the world working at this camp. We are currently halfway through the Session 3 of 4 and I am having an indescribable amount of fun. I also love everyone on staff with me, and they are a huge reason why this job is absolutely amazing.
I think that I have hit on pretty much all of the major highlights of my life as of late. I'll definitely be posting more often soon; I discovered a new thrift store and I have been working on a variety of DIY projects that I cannot wait to share with you!!
Until next post!
Love, Leaza
P.S. I forgot to mention that this picture of me was found on Pinterest by my friend!! I was so excited!
As I cry over the outcome of the Redskins playoff game, I bring you part two of my Winter DIY Series. Like I said yesterday, these are simple projects that are fun to make and great gifts!!
Today's project is a country-chic drink coaster made out of an old CD; easy and super easy to customize (depending on how you decide to finish it).
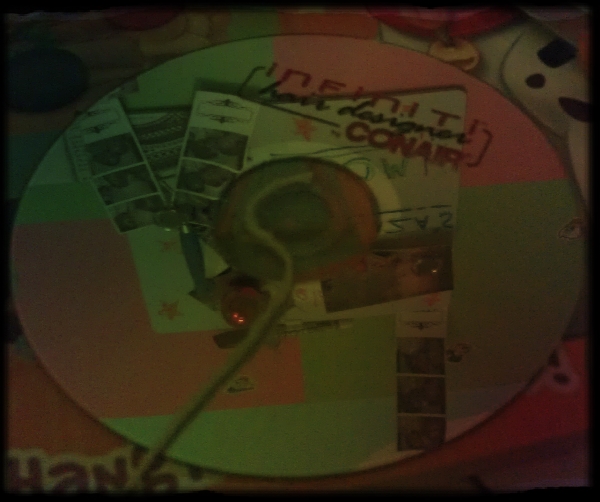
For this project, you need an old CD or DVD (mine is a Conair blowdryer tutorial), a long bit of twine, some felt, spray paint, and a simple glue gun (be sure you have many, many glue sticks on hand).
I started by wrapping my twine in a spiral shape from the center of the CD moving out, using my glue gun to attach the twine as I went along.
After I completely covered the CD in twine, I cut the end and secured the loose end with an extra bit of glue.
Next, I traced my CD on my felt. I cut out that circle and used my glue gun to attach the felt to the exposed underside of my CD.
After securing the felt, I filled in the center of the coaster (CD) with a small spiral of twine that I glued to the felt underneath.
After adding the center, I was essentially finished my project. However, to give the coaster a more uniform look (and to contrast more with its companion gift), I decided to spray paint the top part of my coaster bronze with a multi-surface metallic paint. After allowing the paint to dry, I had my brand new coaster (aka, half of my Dad's Christmas present)!!
Stay tuned for even more fun, easy DIY tutorials for any occasion. Have a good night, all!!
As I said in my last post, I've had a lot of extra time on my hands during break. Since I've hardly had any time to myself since the summer, I have a mile long list of DIY projects that I have wanted to complete. I've actually impressed myself with how many projects I have tackled over the past three weeks and I am thrilled to share them with you. These are all super simple projects that have only taken me a few hours at most; these are great for the beginner crafter to try.
First up, I created an upcycled sweatshirt based on Jessica Simpson's top in this photo:
I have had a basic light brown sweatshirt for a long time that I never really wear. I got it at Forever21 about a year or so ago when it was on sale as a "yellow-tag deal". As cozy as it is, I find it spending more time in my backpack than actually being worn because it fit a little oddly and was just too plain... don't get me wrong, I love basic neutral pieces more than most people, there was just something weird about this shirt.
But of course, I love my warm clothes and couldn't stand to see this warm shirt go to waste. It reminded me of a blank canvas, and though I wanted to upgrade it, I wasn't quite sure how. So I searched sweatshirt DIY projects on Pinterest and was pin-spired by a tutorial that I found on the blog Wobisobi for this Jessica Simpson top. It seemed simple enough to try and complete in about a day at most, so I gave it a try. I didn't follow the tutorial verbatim, so take a look at my project!!
First, I cut the neck out of my sweatshirt.
This step terrified me, since I am never good with freehand drawing, especially with fabric paint. Luckily, my abstract "leaf" pattern turned out pretty well. I filled in the outline by spreading my fabric paint with a paintbrush, making sure to stay within the lines. (To make this step easier, you could pre-draw and and cut out a stencil made of poster board or cardboard with an exacto knife.)
I then created a similar design in the bottom corner of my sweatshirt. I filled in the design by spreading my fabric paint with my paintbrush again. After I made sure that the pain was evenly spread over my design, I let it sit for a few hours to dry.
When the paint dried, I used fabric scissors (you could use a sharp exacto knife) to cut out the cutouts that I had predetermined in my design. After shaving away a few loose threads, I had my brand new sweatshirt!!
I hope you give this tutorial a try to dress up any old, boring sweatshirts you may have!






.jpg)


